It has been a while since my last post and I’m going to step away from Web development for this next series and teach you all how to build a quadcopter.
This is something that has interested me for a while now and I decided to jump right into the deep end and go ahead and buy some parts to build a quadcopter. Now, this probably isn’t the idea for a lot of people – especially those who have never flown RC before – and in most cases it is recommended to go out and buy a RTF (ready to fly) mini-quad such as the Syma X1. This will allow you to get the feel of flying a quad while also allowing you to crash without doing a huge amount of damage. It’s also relatively cheap and the Syma can be picked up for as low as $30 when on special.
However, if you’re like me (having only ever flown a tiny indoor RC helicopter) and just want to get your hands dirty then follow along and I’ll show you exactly what you need to build a quad, how to put it all together, and finally how to tune and fly this bad boy.
Parts needed to build a quadcopter
I’m going to list all the parts needed in order to get the quadcopter off the ground as well as a small description explaining what each part does (the more you know!). I’m going to keep it relatively cheap in order to allow beginners to get involved but you need to be aware that this isn’t the cheapest hobby in the world!
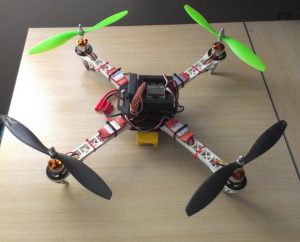
- Frame – Speaks for itself. This is the piece that holds everything together, giving you a nice structure and platform for the rest of the build.
- Motors / Props – The motors spin the propellers giving you the thrust needed to lift the quad off the ground.
- Electronic Speed Controller (ESC) – Connects the motors to the battery converting DC power to AC. It also changes the speed of the motors by varying the current and timing.
- Flight Controller – This is considered the brains of the quadcopter. This keeps the quad steady in the air as well as translating the commands coming from the receiver into movement.
- Battery – This also speaks for itself. Provides power to the ESCs which in turn provides power to the motors and controller.
- Radio / Receiver – This is what the pilot uses to fly the quad while the receiver sends the pilots commands to the controller.
Which parts to buy
This is probably the most intimidating part of building your first quad (not do dissimilar to building a PC) and the questions/posts/threads you see most are more often than not around compatibility/confirmation/queries of a parts list.
I’m going to help you out here and give you a basic list of parts (as well as a few much needed miscellaneous accessories) in order to get you off the ground faster. All parts will link to HobbyKing which in my personal opinion is easily the #1 supplier in the world. They also ship worldwide so it makes it simpler also.
Main Parts
Frame
This is a nice solid frame that is still reasonably light. You can also buy spare arms in case one snaps in a crash and you can also buy addons in order to attach a camera.
Motor/Props
- D2830-11 1000kv Brushless Motor x4
- 10×4.5 SF Props 2pc Standard Rotation/2 pc RH Rotation (Black) x2
- 10×4.5 SF Props 2pc Standard Rotation/2 pc RH Rotation (Green) x2
Again these motors are solid and are fairly cheap, so good for starting out. With the props you can see I have 2 sets of both green and black, this is mainly so you can put the green on the front and not get confused by the orientation of the quad (you’ll thank me later). Also I suggest grabbing 2 lots of each so that you have spare. You will break some, so be prepared.
ESC
- Hobby King 30A ESC 3A UBEC
- HXT 4mm to 4 X 3.5mm bullet Multistar ESC Power Breakout Cable
- PolyMax 3.5mm Gold Connectors 10 PAIRS (20PC) x2
These ESCs can be flashed with the popular SimonK firmware, so as well as being fairly cheap they are also practical. You’ll need the breakout cable in order to connect the ESCs to the battery which also means you’ll need the 3.5mm connectors in order to connect the ESCs to the breakout cable. This requires soldering so if this doesn’t sound like you, there are a few alternatives. Namely the Turnigy Multistar 30 Amp Multi-rotor Brushless ESC 2-4S which don’t require soldering. These are more often than not on back order, so be prepared to wait around a while.
Flight Controller
This is probably the easiest flight controller to use for most beginners, but it is also advanced enough to allow you to tune the quadcopter and have quite a lot of control.
Battery
This is a decent sized battery (albeit a bit heavier) which will allow for some decent flight times. I get a good 10-15min flying around. Even more if I’m being gentle.
Radio / Receiver
- Turnigy 9X 9Ch Transmitter w/ Module & 8ch Receiver (Mode 2) (v2 Firmware)
- 10CM Male to Male Servo Lead (JR) 26AWG (10pcs/set)
This is the most expensive part but it is very much worth it. Probably the most popular Radio going around today it gives you a lot of breathing room to later use the unused channels for any addons. If this seems slightly outside of your price range then you could go with the Hobby King 2.4Ghz 4Ch Tx & Rx V2 (Mode 2). The extra servo leads are required to connect the transmitter to the KK2.0 board.
Misc Parts
Low Voltage Alarm
This is something that is recommended by most people. The low voltage alarm will sound quite a loud noise when the battery is running low. This will save you from probable disaster (read: crash) and will also help you maintain the life of the battery.
Battery Strap
How else will you attach the battery to the frame
Prop Balancer
Having balanced props will mean having a smoother flight. Less vibrations means less chance of stuff coming loose or being broken. Quite important to have. Put the propeller in here and if it falls to one side, either just sand the heavy side down or attach tape to the light side to even it up.
Power Supply / Balancer
- Hobbyking 105W 15V/7A Switching DC Power Supply
- Turnigy Accucel-6 50W 6A Balancer/Charger w/ accessories
Needed to charge the battery.
All up this comes to just over $250USD (excl shipping), so it isn’t all that expensive. You could save a bit of money getting the slimmed down radio, but again if you’re serious about building a quadcopter then you’ll more than likely want/need the Turnigy 9x.
This should give you a general idea on the parts needed to build a quadcopter. Next up in part 2 we’ll look at putting all these parts together. Stay tuned!
2 thought on “Build a quadcopter (Part 1) – The parts”